Tuesday, October 22, 2013

Gardening: Update (general)

So, the 2nd set of green beans that I have planted have started to emerge.

Yesterday, I planted a sweet basil plant, another husky cherry tomato plant, and a yellow pear heirloom tomato plant. So my total plants right now are:
2 Husky Cherry Tomato
1 Super Sweet 100 Hybrid Cherry Tomato
1 Yellow Pear Heirloom Tomato (picture looks like it is a cherry tomato variety, but it doesn't say that on the package. So we shall see)
8 Jalapeño
1 Sweet Basil
1 Lemon Tree (Meyer)
3 Green Bean (Bush variety, from seed)


Last night, I also put out some snail and slug killer since I suspect that that is what ate my 2 other Super Sweet Cherry Tomato plants. So we shall see if that fixes my recent problem.

I noticed my older Husky Cherry Tomato plant and one of my jalapeño plants now have flowers. So cherry tomatoes and jalapeños  should be coming soon! So excited! 

I checked out a website that says general growing season for South Florida is August-February. I an also exploring the idea of joining a community garden for next year. That way I don't have to worry about the HOA and I have the potential to grow more produce. They also ask participants to donate 10% to a charity, which is great too. The cost is anywhere from $35-$80 per year, which is not bad at all. The website warns that there might be a wait list at some locations, so I want to go scouting and info gathering soon.

Sunday, October 20, 2013

Cooking: Pot Roast

One of my family's staples is pot roast. It is really easy to make, not too much of an active time commitment, and makes a great amount of food.

Everyone has their own way of making pot roast. I have heard of red wine being added, cutting slits in it and pushing garlic in the slits, etc.

This is the method that my family trusts pretty well:

1) Sear the pot roast in a cast iron skillet. Before I sear it, I salt and pepper liberally on all sides. Then I coat in all purpose flour. Get cast iron skillet hot over medium high heat. Add a layer of canola oil to just coat the bottom of the skillet and let it get hot for a moment. Then add the pot roast. Let sear a couple of minutes on each side to get a good crusty coat (not burned though). Don't forget to sear all the sides. 

2) Pour 2 containers of beef broth in the crock pot. Add the pot roast meat. I generally try to allow a total of 2 hours per pound of meat on medium heat. My crock pot has 4 settings; 4, 6, 8, 10 hrs. I place the crock pot on 8 hours.

3) I let it cook until there are about 4 hours to go. It is time to add the veggies.  I half the red potatoes after washing them and add them to the crock pot. Wash the baby carrots and add to the crock pot. Quarter cut the onion and separate the slices and add to the crock pot. Add salt. You want to add more stock if needed. The stock should cover the meat and let the veggies soak too. Stir and then let it work its magic. 

4) Test at around 5-6 hours. If the meat is fork tender but the veggies aren't, then take the meat out and lightly foil it. I leave it on the counter for a bit to cool. If the veggies are going to take a long time, I place the meat in the refrigerator until about 30 min to dinner time. Then I add the meat back in to warm up.

I generally serve this with some sweet honey cornbread. I buy a boxed mix version right now until I can find a good from scratch version that tastes as good. 

Here is what I figure the cost should be (minus cornbread):
 
2.5 lb pot roast=$15
1 bag Baby Carrots=$2
1 bag Red Potatos=$4
1 onion=$1
3 containers of premium beef broth=$6
Total=$28 (high estimate)/9 hearty servings
$3.11 per serving 


Gardening: Bush Green Beans

This is a plant of firsts. This is the first time I have planted green beans and the first time I planted anything from seed.

I always heard they were vining, and being that I am at a condo with landscapers, that kind of structure is too involved. Then I went to my grandmother's house last year and she gave me seeds for a variety that was a bush type, meaning not vining. I lost them for planting season last year but rediscovered  them for this season. 

I thought it wasn't going to happen this year either because I ran out of soil. Then 2 tomato plants bit the dust, which left me with 2 planters with nothing in them. So I poked a bean down about 2-3 inches deep and watered it. Usually they say to plant indoors first and then transplant them, but that is more if the temperature is less than 75 degrees outside. It is currently an average of 85 in South Florida. So I decided to go for the direct planter method. 

I didn't know if anything was happening. Were they dead? Eaten by birds? Growing upside down? Who knows?! So I just kept watering it with the others. Then 1-2 weeks later...a sprout! It was so cool looking! I was so surprised it actually worked!

I planted 2 others in a different planter a few days after this first one, so I excited to see if those sprout too. I will give more updates soon.


Gardening: Jalapenos

This is the second year I have grown jalapeños. I tried jalapeños because I like to make salsa and my best friend's recipes use a lot of jalapeños. My father also likes jalapeños on just about everything. So this was something we would eat.

The first year, I planted 2-6inch tall jalapeño  plants. Within a week, one jalapeno plant was eaten by snails. 

The second plant was attacked by white flies within a month. The white flies look like white scales on the underside of the leaves. I tried to just wipe them off, thinking that it was just some kind of fungus or hard water deposits. It got some off, but not all. Then the landscaper caught me and said that they are white flies and that I need to spray them. I sprayed them with a natural spray and was able to get a total harvest of 4 jalapeños...not impressed. The spray was just Canola oil and water...I paid for it before I found out the ingredients. This year I will try making my own instead. The landscaper said it is unusual for them to attack jalapeño plants.

So this year, they sold them in a tray of 9. They were younger plants, maybe 3 inches tall. While transplanting them, 1 stem broke off. I didn't have enough planters for the 8 to have their own planter, so I put 2 each. So far, the snails have stuck to tomato plants, but I am going to add snail killer to all of them.

When they start flowering and growing, I will give more updates.


Gardening: Tomato Plants

This is the third year I have planted cherry tomatoes. I live in a one story condo with an HOA that does the landscaping. So I have to plant them in containers and hide them among the other landscape so the HOA can't complain too much. The landscapers think it is funny that I grow tomatoes and jalapeños in containers. Their interest also mean they give me some good information when they see some issues (like an invasion of white flies). For now, I will discuss cherry tomatoes.

I buy them when they are about 6 inches tall from the local hardware store. The last 3 years I have bought them in early October. They grow really well over the winter here up until about January or February. In a gardening book, I learned that Florida's first "frost" can be in December, and then last "frost" is in January. So this year I am going to try to get 2 growing seasons in. The summer is so hot that i just don't think they will live through the summer, but we shall see. 

I have never tried to grow them from seed...that will be this February. I use moisture control potting soil because I am not disciplined enough to water everyday, don't trust myself to not overwater, and South Florida is very unpredictable with rain amounts. I generally water them well every other day.

The first year, I started in smaller planters (clay) and then transplanted them into bigger planters (clay). This shocked them and also made me lose a lot of tomatoes to the ground...too much shaking. 

The second year I experimented and did half of my plants in plastic and half in clay but started them all out in larger pots so I didn't need to transplant them. The plants in plastic were shorter and not as fruitful as the ones in clay pots. So no more plastic planters for me.

This year, I used all large planters and bought extra plants (4). Usually I do 3 cherry tomato plants. I bought 3 Super Sweet and 1 bush type (not supposed to be as tall). Within 2 days, 2 of the Super Sweet were eaten by an unknown insect. It left the leaves alone, but ate the stems right at the base. A friend at work thinks it is a tiny caterpillar that loves tomato plants. I think it is snails. I didn't see snails in the pots in the aftermath, but I did a night inspection and 2 snails were discovered in the 2 remaining pots. I had this problem last year with my jalapeño plants so I have left over snail killer. I am going to replant the 2 Super Sweet tomatoes soon.


Cooking: Biscuits and gravy

Today was the first time I made biscuits and gravy. That seems like the epitome of country cooking, but somehow I missed that cooking lesson from my grandparents. I remember watching them make it for church functions so I had the basic concept in mind. 

So here is the general concept of gravy:

1) Brown 1 lb of sausage into crumbles. I used mild sausage, but I think any would work. Also, to save time crumbling the sausage in little bits, I cut one end of the sausage roll off and then used my fingers to pull small chunks and put them in the pan in a single layer.

2) Once the sausage is brown and in small-ish bits you need to make a rue. A rue is a fancy term meaning add flour to a fat to create almost a paste. Brown the paste for a bit to add flavor. To do this to our sausage you can either remove the sausage with a slotted spoon and leave the grease in the pan, or leave everything in the pan and just add the flour on top of the sausage. Today, I tried to remove the sausage and then add flour. I added 3 Tbsp...which was too much flour. Next time I would add 1 Tbsp and then stir it in and then keep adding until it forms a good paste. Since I added too much at once, I added the sausage back to the pan and it seemed to soak up the flour well. I let it cook for a couple of minutes on medium heat until the flour was a golden brown. 

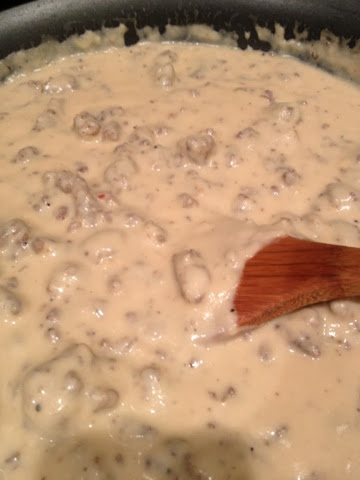
3) Add whole milk. I didn't have milk...technically. I had a can of evaporated milk. So I mixed the can of cream with some water to thin it out. I poured about 1 cup in and stirred it in the rue until incorporated. Generally, add enough milk to almost cover the sausage crumbles. Let it cook on low and it will begin to thicken. Once it is thicker, add pepper to taste. Taste it. Add salt if needed. If the gravy gets too thick, just add more milk and stir in.

Biscuits:
My grandparents kept it easy. Buy biscuits in a tube and bake them. I made a quick mix I found recently in a 1970's sustainability book and made mine from scratch. There are also some in the freezer isle at the grocery store that would be good as well. Whichever works best for your family will be just fine. 

The biscuits I made were awesome. They were a bit sweet, but I like sweet. Next time, I would make them thicker. I made the dough about 1/2 an inch thick, but they didn't rise much. So next time, I will try 1 inch thick. 

My mom and I ate the biscuits and gravy. My dad is not a fan in general of biscuits and gravy, so I didn't take it personally. I really liked the balance of sweet biscuits and salty/savory gravy. My mom loved the gravy and the biscuits, but not together. So next time I will try altering the biscuit mix to have a little less sugar. 

Overall, great breakfast. Not very healthy, but if you have a very physical day ahead of you, this might be good to get you through. Plus, it is pretty inexpensive. For the biscuits and gravy, it cost about, $5.87 (as a high estimate). Sausage=$3/lb, Flour=$0.50 (biscuits=$0.45, gravy=$0.05), Milk=$0.75, Sugar=$0.25, Eggs=$0.66, Butter=$0.66, Baking Powder=$0.05. Biscuits (12)=$2.07, Gravy=$3.80. This could easily make 6 hearty portions. Total=$0.98 per serving. Not too bad.