Friday, December 27, 2013

The Ultimate Back to Basics

I have come to realize that the ultimate event that gets us all back to basics is death. It is never something we want to face, and yet it is something we all have to experience. Part of life, is death.

When we pass away, it is not the material possessions that matter most. It is not how much money we had, the cars, houses, clothes, electronics, or furniture. I am pretty sure none of that passes through a person's mind when death calls your name. 

In the days after someone's passing, those material things are boxed, bagged, thrown away, shipped to family and friends, donated, or sold. The material things mean very little after the person that gave those items meaning and life has passes away.

What lives on are the events, experiences, leasons learned and taught. The people that remain are the legacy of those that have long passed away. With every story, whether it is retold, expressed in a craft that was taught or an old family recipe, that person's memory lives on. We continue their journey with them and for them. 

After a long battle with cancer, my beautiful mom passed away on December 17, 2013. She will be greatly missed but her legacy lives on. It lives in me, my dad, the family and friends that were so greatly touched by her love, support, humor, and compassion. Although she has passed away, the great wave of impact she had on this world lives on. I will tell her story, cook her recipes, continue her passion to learn new crafts, and to reach out and experience the world and its people. 

I leave you until next time with a few lines by ee cumming's "i carry your heart with me":

"here is the deepest secret nobody knows
(here is the root of the root and the bud of the bud 
and the sky of the sky of a tree called life; which grows
higher than the soul can hope or mind can hide)
and this is the wonder that's keeping the stars apart

i carry your heart (i carry it in my heart)"


Wednesday, December 11, 2013

Cooking: Baked Fried Chicken Secret

A few months ago, on a trip to Indiana, my grandma and I were talking together at the kitchen table. That is where some of the greatest conversations occur. Cooking tips, family history, family secrets, catch up on the happenings of the family, etc. It is place where ideas are shared, dreams are dreamed, plans are made, games played, puzzles solved. In my family, the kitchen table is where life plays out. 

During my most recent trip to Indiana, while hashing out some cooking conundrums, we started discussing baked breaded chicken. We had both been stumped on how to get crispy chicken from the oven. When we bake it, one side is always soggy. So how do you get all sides crispy? I came up with an idea, but neither of us was sure it would work so we decided to try it out and see what happened.

Today I tried it. I made chicken nuggets from chicken tenderloins that were on sale. Cut them into 2 inch pieces. Dredged the pieces in a beaten egg. Coated in a breading mixture (panko is great, also crushing up some fried onion strings is also great). Place pieces onto a wire rack that is placed on a baking sheet. That's the secret! The wire rack allows air flow below the chicken pieces and allows the excess juices to drip to the baking sheet and leaves the chicken crispy. Bake at 400 degrees for about 20 minutes until cooked through.

This time I did not spray the wire rack, but next time I will. Some of the pieces stuck to the rack a bit, but not much. 

So there is my new discovery! Bake breaded chicken on a wire rack and it should come out crispy all over! Yum yum!

Saturday, December 7, 2013

Monday, December 2, 2013

Gardening: Jalapeño update

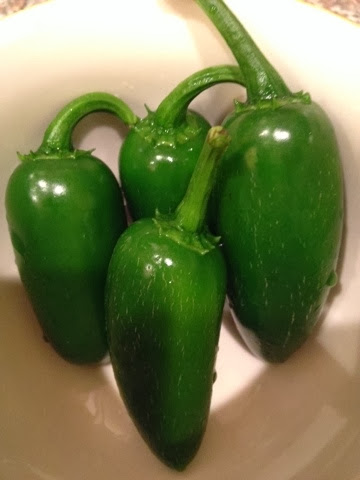
They are ripe! Went out to check this morning and 4 are ripe with those little texture lines on them! Can't wait to make some white chicken chili or regular chili with them. Unfortunately it makes the whole house smell like soup which is something that the people I live with don't appreciate. We shall see.


Friday, November 22, 2013

Gardening: Jalapeño Update

I read online and in a few books that when flowers show up on the jalapeño plant to add some epson salt to the water and it will produce more jalapeños than with just plain water. Last year I had 4 total jalapeños on 2 plants. So it didn't seem like a worthwhile plant unless you have a lot of plants. So I tried this epson salt tip. Within 2 days of watering the 8 plants with a 1/2 cup of epson salt added to the watering can, the plants had a ton of flowers on it. Now, I have a lot of jalapeños. 


I am experimenting with where I have placed the plants. 2 pots with 2 plants each are placed on the Northeast corner of the house with no other plants around. I also have 2 pots with 2 plants each placed on the East wall of the house by the front door. There are hedges across the pathway. The ones on the northeast corner are growing better than the ones by the door. I need to figure out a way to put plants on that corner without killing the grass. I am thinking a platform of sone sort might work. Still thinking that one out. 

I will give another update once I start harvesting them.

Thursday, November 21, 2013

Gardening: Lemon Plant

My lemon plant finally started to flower. The flowers are so weird. They come out as a inch long nub and then one day it breaks apart into a flower.


Then a few days later it drops the petals and leaves little green nubs. 


I am hoping those turn into lemons. We shall see.

Gardening: Tomato Update

So it has been a couple of weeks that my tomato plants have sprouted tomatoes. They are still green. This happens every year, but I get impatient during this time of the process. It seems like they stay the same size and green forever! 

Once they turn red, then I get so many tomatoes at one time I have to give them away. But I love giving them and so far I haven't recieved any complaints. It is also a guilt free gift to give, unlike cookies and cakes.

So, here are my tomatoes so far:


Gardening: Bush Green Beans Update

About a week ago, the green bean plants  started to grow these pretty purple flowers. Being that I have never grown green beans, I was surprised at how pretty the flowers were.

Then I noticed today that small green beans are now forming. They are little, but so far it appears that my first green bean planting (from seed!) is a success. I am going to weigh my crop this year so I know how much yield per plant I will get so I can balance my garden for next year. That way I get enough of what I like and just enough of the somewhat like.


Tuesday, October 22, 2013

Gardening: Update (general)

So, the 2nd set of green beans that I have planted have started to emerge.

Yesterday, I planted a sweet basil plant, another husky cherry tomato plant, and a yellow pear heirloom tomato plant. So my total plants right now are:
2 Husky Cherry Tomato
1 Super Sweet 100 Hybrid Cherry Tomato
1 Yellow Pear Heirloom Tomato (picture looks like it is a cherry tomato variety, but it doesn't say that on the package. So we shall see)
8 Jalapeño
1 Sweet Basil
1 Lemon Tree (Meyer)
3 Green Bean (Bush variety, from seed)


Last night, I also put out some snail and slug killer since I suspect that that is what ate my 2 other Super Sweet Cherry Tomato plants. So we shall see if that fixes my recent problem.

I noticed my older Husky Cherry Tomato plant and one of my jalapeño plants now have flowers. So cherry tomatoes and jalapeños  should be coming soon! So excited! 

I checked out a website that says general growing season for South Florida is August-February. I an also exploring the idea of joining a community garden for next year. That way I don't have to worry about the HOA and I have the potential to grow more produce. They also ask participants to donate 10% to a charity, which is great too. The cost is anywhere from $35-$80 per year, which is not bad at all. The website warns that there might be a wait list at some locations, so I want to go scouting and info gathering soon.

Sunday, October 20, 2013

Cooking: Pot Roast

One of my family's staples is pot roast. It is really easy to make, not too much of an active time commitment, and makes a great amount of food.

Everyone has their own way of making pot roast. I have heard of red wine being added, cutting slits in it and pushing garlic in the slits, etc.

This is the method that my family trusts pretty well:

1) Sear the pot roast in a cast iron skillet. Before I sear it, I salt and pepper liberally on all sides. Then I coat in all purpose flour. Get cast iron skillet hot over medium high heat. Add a layer of canola oil to just coat the bottom of the skillet and let it get hot for a moment. Then add the pot roast. Let sear a couple of minutes on each side to get a good crusty coat (not burned though). Don't forget to sear all the sides. 

2) Pour 2 containers of beef broth in the crock pot. Add the pot roast meat. I generally try to allow a total of 2 hours per pound of meat on medium heat. My crock pot has 4 settings; 4, 6, 8, 10 hrs. I place the crock pot on 8 hours.

3) I let it cook until there are about 4 hours to go. It is time to add the veggies.  I half the red potatoes after washing them and add them to the crock pot. Wash the baby carrots and add to the crock pot. Quarter cut the onion and separate the slices and add to the crock pot. Add salt. You want to add more stock if needed. The stock should cover the meat and let the veggies soak too. Stir and then let it work its magic. 

4) Test at around 5-6 hours. If the meat is fork tender but the veggies aren't, then take the meat out and lightly foil it. I leave it on the counter for a bit to cool. If the veggies are going to take a long time, I place the meat in the refrigerator until about 30 min to dinner time. Then I add the meat back in to warm up.

I generally serve this with some sweet honey cornbread. I buy a boxed mix version right now until I can find a good from scratch version that tastes as good. 

Here is what I figure the cost should be (minus cornbread):
 
2.5 lb pot roast=$15
1 bag Baby Carrots=$2
1 bag Red Potatos=$4
1 onion=$1
3 containers of premium beef broth=$6
Total=$28 (high estimate)/9 hearty servings
$3.11 per serving 


Gardening: Bush Green Beans

This is a plant of firsts. This is the first time I have planted green beans and the first time I planted anything from seed.

I always heard they were vining, and being that I am at a condo with landscapers, that kind of structure is too involved. Then I went to my grandmother's house last year and she gave me seeds for a variety that was a bush type, meaning not vining. I lost them for planting season last year but rediscovered  them for this season. 

I thought it wasn't going to happen this year either because I ran out of soil. Then 2 tomato plants bit the dust, which left me with 2 planters with nothing in them. So I poked a bean down about 2-3 inches deep and watered it. Usually they say to plant indoors first and then transplant them, but that is more if the temperature is less than 75 degrees outside. It is currently an average of 85 in South Florida. So I decided to go for the direct planter method. 

I didn't know if anything was happening. Were they dead? Eaten by birds? Growing upside down? Who knows?! So I just kept watering it with the others. Then 1-2 weeks later...a sprout! It was so cool looking! I was so surprised it actually worked!

I planted 2 others in a different planter a few days after this first one, so I excited to see if those sprout too. I will give more updates soon.


Gardening: Jalapenos

This is the second year I have grown jalapeños. I tried jalapeños because I like to make salsa and my best friend's recipes use a lot of jalapeños. My father also likes jalapeños on just about everything. So this was something we would eat.

The first year, I planted 2-6inch tall jalapeño  plants. Within a week, one jalapeno plant was eaten by snails. 

The second plant was attacked by white flies within a month. The white flies look like white scales on the underside of the leaves. I tried to just wipe them off, thinking that it was just some kind of fungus or hard water deposits. It got some off, but not all. Then the landscaper caught me and said that they are white flies and that I need to spray them. I sprayed them with a natural spray and was able to get a total harvest of 4 jalapeños...not impressed. The spray was just Canola oil and water...I paid for it before I found out the ingredients. This year I will try making my own instead. The landscaper said it is unusual for them to attack jalapeño plants.

So this year, they sold them in a tray of 9. They were younger plants, maybe 3 inches tall. While transplanting them, 1 stem broke off. I didn't have enough planters for the 8 to have their own planter, so I put 2 each. So far, the snails have stuck to tomato plants, but I am going to add snail killer to all of them.

When they start flowering and growing, I will give more updates.


Gardening: Tomato Plants

This is the third year I have planted cherry tomatoes. I live in a one story condo with an HOA that does the landscaping. So I have to plant them in containers and hide them among the other landscape so the HOA can't complain too much. The landscapers think it is funny that I grow tomatoes and jalapeños in containers. Their interest also mean they give me some good information when they see some issues (like an invasion of white flies). For now, I will discuss cherry tomatoes.

I buy them when they are about 6 inches tall from the local hardware store. The last 3 years I have bought them in early October. They grow really well over the winter here up until about January or February. In a gardening book, I learned that Florida's first "frost" can be in December, and then last "frost" is in January. So this year I am going to try to get 2 growing seasons in. The summer is so hot that i just don't think they will live through the summer, but we shall see. 

I have never tried to grow them from seed...that will be this February. I use moisture control potting soil because I am not disciplined enough to water everyday, don't trust myself to not overwater, and South Florida is very unpredictable with rain amounts. I generally water them well every other day.

The first year, I started in smaller planters (clay) and then transplanted them into bigger planters (clay). This shocked them and also made me lose a lot of tomatoes to the ground...too much shaking. 

The second year I experimented and did half of my plants in plastic and half in clay but started them all out in larger pots so I didn't need to transplant them. The plants in plastic were shorter and not as fruitful as the ones in clay pots. So no more plastic planters for me.

This year, I used all large planters and bought extra plants (4). Usually I do 3 cherry tomato plants. I bought 3 Super Sweet and 1 bush type (not supposed to be as tall). Within 2 days, 2 of the Super Sweet were eaten by an unknown insect. It left the leaves alone, but ate the stems right at the base. A friend at work thinks it is a tiny caterpillar that loves tomato plants. I think it is snails. I didn't see snails in the pots in the aftermath, but I did a night inspection and 2 snails were discovered in the 2 remaining pots. I had this problem last year with my jalapeño plants so I have left over snail killer. I am going to replant the 2 Super Sweet tomatoes soon.


Cooking: Biscuits and gravy

Today was the first time I made biscuits and gravy. That seems like the epitome of country cooking, but somehow I missed that cooking lesson from my grandparents. I remember watching them make it for church functions so I had the basic concept in mind. 

So here is the general concept of gravy:

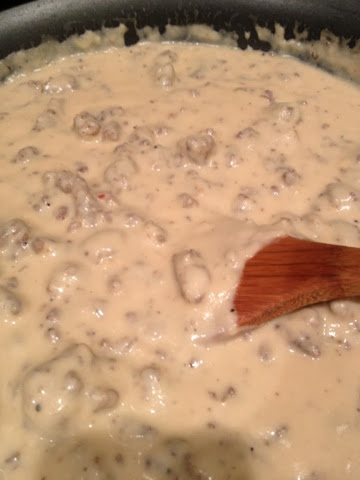
1) Brown 1 lb of sausage into crumbles. I used mild sausage, but I think any would work. Also, to save time crumbling the sausage in little bits, I cut one end of the sausage roll off and then used my fingers to pull small chunks and put them in the pan in a single layer.

2) Once the sausage is brown and in small-ish bits you need to make a rue. A rue is a fancy term meaning add flour to a fat to create almost a paste. Brown the paste for a bit to add flavor. To do this to our sausage you can either remove the sausage with a slotted spoon and leave the grease in the pan, or leave everything in the pan and just add the flour on top of the sausage. Today, I tried to remove the sausage and then add flour. I added 3 Tbsp...which was too much flour. Next time I would add 1 Tbsp and then stir it in and then keep adding until it forms a good paste. Since I added too much at once, I added the sausage back to the pan and it seemed to soak up the flour well. I let it cook for a couple of minutes on medium heat until the flour was a golden brown. 

3) Add whole milk. I didn't have milk...technically. I had a can of evaporated milk. So I mixed the can of cream with some water to thin it out. I poured about 1 cup in and stirred it in the rue until incorporated. Generally, add enough milk to almost cover the sausage crumbles. Let it cook on low and it will begin to thicken. Once it is thicker, add pepper to taste. Taste it. Add salt if needed. If the gravy gets too thick, just add more milk and stir in.

Biscuits:
My grandparents kept it easy. Buy biscuits in a tube and bake them. I made a quick mix I found recently in a 1970's sustainability book and made mine from scratch. There are also some in the freezer isle at the grocery store that would be good as well. Whichever works best for your family will be just fine. 

The biscuits I made were awesome. They were a bit sweet, but I like sweet. Next time, I would make them thicker. I made the dough about 1/2 an inch thick, but they didn't rise much. So next time, I will try 1 inch thick. 

My mom and I ate the biscuits and gravy. My dad is not a fan in general of biscuits and gravy, so I didn't take it personally. I really liked the balance of sweet biscuits and salty/savory gravy. My mom loved the gravy and the biscuits, but not together. So next time I will try altering the biscuit mix to have a little less sugar. 

Overall, great breakfast. Not very healthy, but if you have a very physical day ahead of you, this might be good to get you through. Plus, it is pretty inexpensive. For the biscuits and gravy, it cost about, $5.87 (as a high estimate). Sausage=$3/lb, Flour=$0.50 (biscuits=$0.45, gravy=$0.05), Milk=$0.75, Sugar=$0.25, Eggs=$0.66, Butter=$0.66, Baking Powder=$0.05. Biscuits (12)=$2.07, Gravy=$3.80. This could easily make 6 hearty portions. Total=$0.98 per serving. Not too bad.


Saturday, August 31, 2013

Preparedness: Intro

So, confession time. I love prepping. Yes, I mean the food, water, money, resource building prepping for a disaster kind of prepping. It is a dirty little secret that I share with very few people. I love the analytical planning and calculations. I love making up scenarios and trying to think out of the box about how to overcome the obstacles. I love knowing that I have created some security for my family's future.

When I first heard about prepping a few years ago, I thought it was just the people on TV with their bunkers and hand guns saying when the earth goes into chaos they will shoot anyone who steps foot on their land. Or hoarders with piles of junk that "could" be repurposed into something else when the world collapse into chaos. Images of the movie "Blast from the Past" springs to my mind. 

However, as time passed, I realized that, like all things, there are different levels to prepping and different motivations to prep. 

I started to prep when I moved to Florida. It was just to prepare for hurricane season, at first. That is how I sold the idea to my family. Hearing the horror stories of post hurricane survival was eye opening. Even in that, there are different levels. Stories ranging from no power for a month, walking miles to get ice and water in 90 degree temps, no gas at gas stations. Then stories of, we got alcohol and cigarettes and hulled up at the bar to wait it out and the big party afterwards to barbecue all of the meat before it went bad. All of these stories left an impression on my family in different ways but we all agreed that having spare supplies on hand would be a good idea.

I have not been in a hurricane yet, let alone experiencing life after one. I thought of the scenarios that could occur based on the afore mentioned horror stories/party stories and started prepping to make my family as comfortable as possibly and try to avoid the rush at the market for last minute items.

My prepping has grown from hurricane prepping to an economic rainy day preparedness. I started that transition when my mom became sick and watching the recent TV shows based on the world after catastrophes (no power, zombies, epidemics). I am trying to create a buffer in case there is an interruption in my income. I do think that we could go into another depression at some point as a nation/world, but I prep mainly for personal income reasons. 

My prepping is a little adjusted because I am not in a permanent residence yet. It is not land that I own and we might be moving, so I can't go crazy with tons of food and water storage at this time. Each person's situation is different. So, I am going to have different focuses on prepping and give different ideas. Some of those ideas I have personally used, some I would like to do when my situation changes, and some that I would not foresee using but might be good for someone else.

My methods might not be perfect for you, but I hope it gets you thinking of ways to insure your families well being for  whatever the future holds.

Tuesday, June 25, 2013

Quilting

I have never taken on a quilting project. My great grandmother quilted. She would make a quilt for family members as a wedding present. It was one of those traditions that many of my family members looked forward to. It was a rite of passage almost. She always quilted by hand. Every stitch was time and love. They were beautiful quilts, still cherished by our family. I, unfortunately, will not receive  such an heirloom since she passed away in my early teens. However, I remember all of the love she put into those quilts. All of the good wishes she would send in those quilts.

My mom took up quilting awhile back. Her hobby, it seems, is collecting crafts. She did not have the patience for hand-quilting, nor do I. I am a bit of a immediate satisfaction kind of person. So I approached my mom to see if she would teach me the art of quilting. She said that she had wanted to start a new project as well. So we took on the project together. 

We are starting with a simple chevron pattern (looks like zig zags).

Lesson 1: cutting the fabric

Iron the fabric first. She says the washing the fabric is suggested, but she never did. So we aren't going to either.

Then cut into manageable pieces. Then into the size the pattern requires. This is tedious work already. It is also not all that inexpensive. The sewing machine, thread, cutting mat, plastic ruler, rotary cutter, fabric, etc. It adds up. Then add time. 

I took a photography class and in the advanced class the teacher taught us how to price our work. Figure an hourly rate, lets say $10. Then take the time to develop  the film, print, framing, taking the picture, and cost of materials. The picture really started to get expensive. 

If you are quilting for money, the quilt is going to get expensive (we are talking $100's). If you are quilting for love, then the expense is totally worth it.

So that is where I am at now. Ironing and cutting fabric squares with my mom. So far, it is a labor of love and a great time with my mom.


Sunday, June 16, 2013

Baking

I love to bake. I grew into loving to bake. I didn't start truly loving it until I was 25. When I moved to Florida, I started to miss Sunday dinners at my grandparents' house. My grandma would have a whole table of great food and multiple desserts to please every palate. I didn't think much about the tradition until we moved 1200 miles away from it. 

So on a trip back to Indy, I hit my grandma up for some recipes. I got some of everyone's favorites. My dad's favorite jelly roll, family/world favorite sugar cookies (top secret and you will never see published), great-grandma's bread, etc. The time gathering these recipes was precious to me. The care taken to perfect each recipe over time. The little handwritten notes in the cookbooks. The family's little secrets. 

I love to bake. Cooking is cool too, but I love to bake. I love the family time, the gift of a baked good to someone you love, the time it takes to take ingredients that don't really taste good on their own and make it into magical deliciousness. It is kind of like family...they work as a team and in the end magic happens. It makes life slow down a little bit. In life, slowing down every once in awhile is important and anything important is worth the time. Baking is worth the time.

Today, I made Banana Bread. It was a new recipe. I decided to double it because I have this notion of freezing it for later (we shall see). It barely fit in the biggest bowl, but I was careful. My mom was there every step of the way working in tandem. We are a great team. We have that relationship many people dream about. We are friends. Best friends. Friends bake together...they just do.

Anyway, back to the bread. For a first attempt, not too shabby. When I try a new recipe, I always go directly by the book. I respect the recipe maker's vision. After the first run, I start changing things. Maybe nuts next time. Maybe some cranberries. Switch it up a bit. 

I am not giving a recipe here 1) because it is not my own 2) getting back to basics is just about the act of getting back to basics. It isn't about a certain recipe...it is about the journey. 

So take some time and find something you would buy, be it bread, cookies, brownies, cupcakes. Find a recipe and try it out. See what ingredients go into it. Compare it to the packaged version. I am sure you will see a few ingredients on the package you won't find in your pantry. For example, my box of pancake mix includes "sodium caseinate"...spell check doesn't even know what that it. "Sodium" I understand, "caseinate" I don't. Not sure where I will find that in my cupboard. I digress.

Bake it. Share the experience with someone else. Be it bringing them in the kitchen chaos or bringing them the fruits of your labor. Food used to be a social affair and we sometimes demonize it. 

Get back to the basics. Bake something.


Friday, May 3, 2013

Introduction

There are some basic skills that we are in danger of forgetting as our world becomes more industrial and commercialized. We have lost touch with those basic skills that used to be commonplace. We rely on our ability to go to the store and buy everything we need. From how to plant a garden to make a quilt. What if those convenances were removed and we forget what our great grandparents taught us? Skills that got them through the good and bad times?

Skills are something no one can can take from us. They are lessons that we learn and can use whenever we need. We can use those skills to survive, make money, help others. This blog is about my journey to get back to basics. To try to relearn those skills my family has put on the back burner or might have never learned.

I am going to try a different skill each week. Topics will range from: cooking, mending, quilting, soap making, knitting, prepping (not bunker building prepping, but just getting things together for a rainy day kind of prepping), canning, candle making, etc.

Just so you know where I am coming from. I was born and raised in the suburbs of Indianapolis. My mom has always said she was born in the wrong decade. She loves crafts. Collecting crafts is a hobby of hers. She has learned cross stitch, basket weaving, quilting, crocheting, wood working and painting, doll making, scrapbooking, card making, stampmaking, and jewelry making. She has sold some of her work at craft shows, but mostly she likes to teach others or give them to friends and family for free. My paternal grandmother earned extra cash from making rugs on a loom. My paternal great grandmother sewed quilts by hand and hand made lace doilies. As you can see, I come from crafty stock.

The men of my family are not without skills too. My father's family came from rural areas so hunting, fishing, farming, gardening, and mushroom hunting were skills learned at a very young age.

I moved to South Florida a few years ago but I have not lost my Midwestern roots. 

So this blog is a tribute to my ancestors and the ancestors that built this country in general.